क्या आप राजस्थान के किसी सरकारी स्कूल में शिक्षक या स्टाफ मेंबर हैं? क्या आप Shala Darpan Staff Window का उपयोग करना चाहते हैं लेकिन समझ नहीं आ रहा कि कहां से शुरू करें? चिंता न करें! यह comprehensive guide आपके सभी सवालों के जवाब देगी।
इस detailed article में हम आपको staff window shala darpan की हर छोटी-बड़ी जानकारी step-by-step बताएंगे। चाहे आप पहली बार registration कर रहे हों या login में problem आ रही हो, यहां आपको सब कुछ मिलेगा।
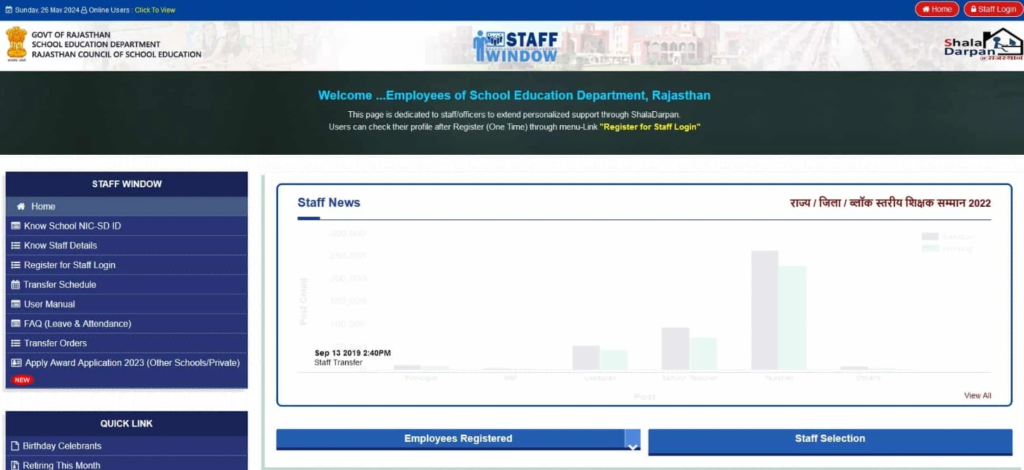
Shala Darpan Staff Window क्या है? – विस्तृत परिचय
Shala Darpan Staff Window राजस्थान शिक्षा विभाग द्वारा विशेष रूप से स्कूल के teachers, principals, और अन्य staff members के लिए बनाया गया एक dedicated online portal है। यह एक secure और user-friendly platform है जहां staff अपने professional कार्यों को digitally manage कर सकते हैं।
Staff Window का मुख्य उद्देश्य:
शाला दर्पण स्टाफ कार्नर को इन मुख्य उद्देश्यों के साथ design किया गया है:
- Paperwork को कम करना – सभी processes को digital बनाना
- Time की बचत – online services से quick access
- Transparency बढ़ाना – सभी records digitally available
- Efficiency में सुधार – automated systems से better workflow
- Accessibility – कहीं से भी, कभी भी access करने की सुविधा
किसके लिए है Staff Window?
- Teachers (प्राथमिक, माध्यमिक, उच्च माध्यमिक)
- Principals और Headmasters
- Administrative Staff
- Clerical Staff
- Support Staff
- सभी Government और Government-aided schools के employees
Staff Window की मुख्य विशेषताएं – Key Features
Shala Darpan Staff Corner में आपको निम्नलिखित प्रमुख features मिलते हैं:
1. Personal Profile Management
- अपनी complete professional profile देखें
- Personal details update करें
- Qualification information maintain करें
- Experience records देखें
- Contact information update करें
2. Attendance System
- Daily attendance mark करें
- Monthly attendance report देखें
- Leave records maintain करें
- Casual leave, medical leave tracking
- Present/Absent status check करें
3. Leave Management
- Online leave application submit करें
- Leave balance check करें
- Leave approval status track करें
- Leave history देखें
- Different types of leaves apply करें
4. Transfer Information
- Transfer schedules देखें
- Transfer orders check करें
- Transfer application submit करें
- Current posting details देखें
- Transfer history access करें
5. Salary & Pay Details
- Monthly salary slips देखें
- Increment details check करें
- Deductions और allowances की जानकारी
- Pay scale information
- Arrears और bonus details
6. Training & Development
- Available training programs
- Workshop notifications
- Professional development courses
- Certificates download करें
- Training attendance records
7. Notifications & Updates
- Department circulars
- Important announcements
- Policy updates
- Examination schedules
- Administrative orders
8. Reports Generation
- Student attendance reports
- Academic performance reports
- School activity reports
- Custom reports generate करें
- Export और print options
Staff Window Services – सभी सेवाओं की विस्तृत जानकारी
Shala Darpan : Staff Corner पर उपलब्ध प्रमुख services इस प्रकार हैं:
1. Know School NIC-SD ID (स्कूल आईडी खोजें)
यह service आपको किसी भी school की unique identification number खोजने में मदद करती है।
उपयोग:
- School name या location से search करें
- District और Block wise filtering
- Quick search functionality
- Complete school details देखें
2. Know Staff Details (स्टाफ विवरण देखें)
इस feature से आप किसी भी staff member की complete information देख सकते हैं।
Available Information:
- Staff का नाम और designation
- Subject specialization
- Posting details
- Contact information
- Service status (active/transferred)
3. Register for Staff Login (नया पंजीकरण)
पहली बार users के लिए registration process।
Required Documents:
- Staff Employee ID
- Aadhaar Card details
- Mobile number (registered with department)
- Date of Birth
- Email ID (optional)
4. Staff Login (स्टाफ लॉगिन)
Registered users के लिए secure स्टाफ कॉर्नर लॉगिन
Login Features:
- Username/Password based authentication
- OTP verification option
- Forgot password recovery
- Session timeout security
- Multi-device access control
5. Transfer Schedule (स्थानांतरण कार्यक्रम)
Transfer related सभी information एक जगह।
Details Include:
- Current transfer cycle information
- Eligibility criteria
- Application deadlines
- Priority rules
- Transfer policy documents
6. User Manual (उपयोगकर्ता मार्गदर्शिका)
Step-by-step guides और tutorials।
Content:
- Registration guide
- Login process
- Feature tutorials
- Troubleshooting tips
- Video demonstrations
7. FAQ – Leave & Attendance
छुट्टी और उपस्थिति से related frequently asked questions।
8. Transfer Orders (स्थानांतरण आदेश)
Latest transfer orders देखें और download करें।
9. Award Applications
Teaching awards के लिए online application।
Available Awards:
- State Teacher Awards
- National Teacher Awards
- Best School Awards
- Innovation Awards
- Subject-specific awards
10. Staff Birthdays
Department के सभी staff members के birthday calendar।
11. Retiring Staff Details
Upcoming retirements की information।
12. Important Circulars
Department द्वारा जारी सभी circulars और notices।
School NIC-SD ID कैसे खोजें – Complete Process
School NIC-SD ID हर school की unique identification number है। इसे खोजने की detailed process यहां दी गई है:
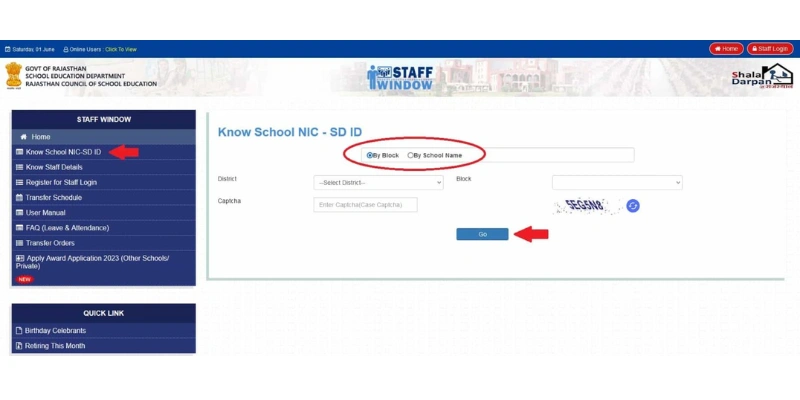
Method 1: By Block (ब्लॉक के अनुसार)
स्टेप 1: Shala Darpan portal पर जाएं
स्टेप 2: Homepage पर “Staff Window“ पर click करें
स्टेप 3: “Know School NIC-SD ID” link पर click करें
स्टेप 4: Search method में “By Block” select करें
स्टेप 5: निम्नलिखित information select करें:
- District (जिला) – dropdown से अपना district चुनें
- Block (ब्लॉक) – अपना block select करें
- Panchayat Samiti (यदि applicable हो)
स्टेप 6: Screen पर दिखाए गए Captcha Code को carefully type करें
स्टेप 7: “Go” button पर click करें
स्टेप 8: Results page पर आपको table format में सभी schools की list दिखेगी जिसमें होगा:
- Sr. No. – क्रम संख्या
- School Name – स्कूल का पूरा नाम
- Block/GP/Village – location details
- Category – school का type (Primary, Secondary, etc.)
- Region – Urban/Rural
- School NIC-SD ID – unique identification number
Method 2: By School Name (स्कूल के नाम से)
स्टेप 1: “Know School NIC-SD ID” page पर जाएं
स्टेप 2: Search method में “By School Name” select करें
स्टेप 3: School Name field में अपने school के नाम के कम से कम 4 consecutive characters type करें
उदाहरण:
- अगर school का नाम है “Government Senior Secondary School, Jaipur”
- तो आप type कर सकते हैं: “Gove” या “Seni” या “Seco”
स्टेप 4: Captcha Code enter करें
स्टेप 5: “Go” button click करें
स्टेप 6: Matching schools की list दिखेगी
Pro Tips:
- ✓ School name exactly वैसा ही type करें जैसा official records में है
- ✓ Spelling mistakes avoid करें
- ✓ अगर results नहीं आ रहे, तो different keywords try करें
- ✓ “By Block” method ज्यादा accurate results देता है
School NIC-SD ID की जानकारी में क्या होता है?
जब आप successfully school search करते हैं, तो आपको मिलती है:
- Basic Information:
- School का official name
- Complete address
- Pin code
- Administrative Details:
- Block name
- Gram Panchayat (ग्राम पंचायत)
- Village/City name
- Classification:
- School category (Primary/Upper Primary/Secondary/Sr. Secondary)
- Management type (Government/Aided/Private)
- Region (Urban/Rural)
- Identification:
- School NIC-SD ID (most important)
- School code
- UDISE code
Staff NIC-SD ID कैसे खोजें – विस्तृत प्रक्रिया
Staff NIC-SD ID हर staff member की unique identification number है। यह आपकी digital identity है जो आपको department के database में identify करती है।
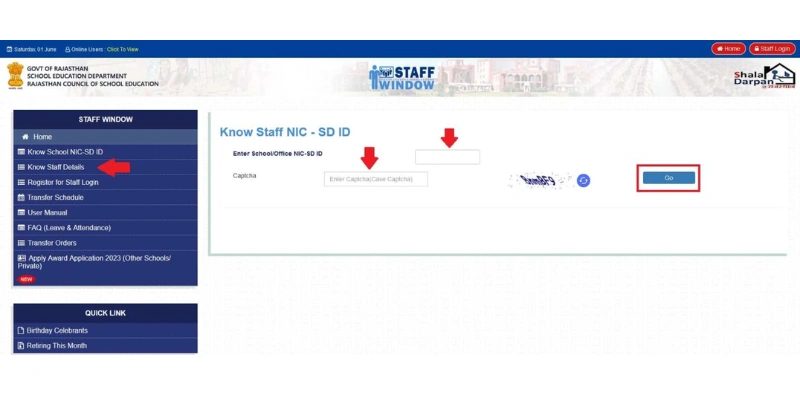
Staff ID खोजने की Process:
स्टेप 1: Shala Darpan की official website खोलें
स्टेप 2: “Staff Window” section में जाएं
स्टेप 3: “Know Staff Details” या “Know Staff NIC-SD ID” link पर click करें
स्टेप 4: एक नया page खुलेगा जहां आपको कुछ mandatory information भरनी होगी:
Required Information:
- School/Office NIC-SD ID: अपने school की unique ID (जो आपने पहले search की थी)
- Captcha Code: screen पर displayed characters
स्टेप 5: सभी details carefully fill करने के बाद “Go” button पर click करें
स्टेप 6: Results page पर आपको उस school के सभी staff members की detailed list दिखेगी:
Display Information:
| Sr. No. | Employee Name | Post | Subject | Staff NIC-SD ID | Staff Status |
|---|---|---|---|---|---|
| 1 | राम कुमार शर्मा | प्रधानाध्यापक | – | 123456789 | Active |
| 2 | सीता देवी | शिक्षिका | Hindi | 987654321 | Active |
| 3 | मोहन लाल | शिक्षक | Mathematics | 456789123 | Transferred |
Staff Details में मिलने वाली Information:
- Personal Information:
- Employee का पूरा नाम
- Father’s/Husband’s name
- Date of Birth
- Gender
- Professional Details:
- Current post/designation
- Subject specialization
- Qualification
- Date of joining
- Service Information:
- Current posting location
- Previous postings
- Service years
- Current status (Active/Transferred/Retired)
- Identification:
- Staff NIC-SD ID (unique number)
- Employee ID
- Personnel Number
Staff ID के उपयोग:
आपकी Staff NIC-SD ID निम्नलिखित कार्यों के लिए जरूरी है:
✓ Staff Window में login के लिए ✓ Salary slips download करने के लिए ✓ Leave applications के लिए ✓ Transfer applications के लिए ✓ Training registrations के लिए ✓ Official correspondences के लिए ✓ Pension और retirement से related कार्यों के लिए
Important Note: अपनी Staff NIC-SD ID को safely note करके रखें और किसी unauthorized person के साथ share न करें।
Shala Darpan Staff Registration – विस्तृत पंजीकरण प्रक्रिया
अगर आप पहली बार Shala Darpan Staff Window का उपयोग कर रहे हैं, तो सबसे पहले आपको registration करना होगा। यह एक one-time process है।
Registration से पहले तैयारी:
आवश्यक चीजें:
- ✓ Staff Employee ID या Staff NIC-SD ID
- ✓ Mobile number (जो department में registered है)
- ✓ Date of Birth (official records के अनुसार)
- ✓ Email ID (optional लेकिन recommended)
- ✓ Internet connection
- ✓ Computer या smartphone
Important: सुनिश्चित करें कि आपका mobile number आपके स्कूल के records में registered है। अगर नहीं है, तो पहले अपने principal या block office में mobile number update करवाएं।
Step-by-Step Registration Process:
स्टेप 1: Portal पर जाएं
- Browser में rajshaladarpan.nic.in type करें और enter करें
- Homepage load होने का इंतजार करें
स्टेप 2: Staff Window Access करें
- Homepage पर “Staff Window” का option खोजें
- इस option पर click करें
- आप Staff Window page पर पहुंच जाएंगे
स्टेप 3: Registration Link
- Staff Window page पर various options दिखेंगे
- “Register for Staff Login” या “स्टाफ लॉगिन के लिए पंजीकरण करें” link को खोजें
- इस link पर click करें
स्टेप 4: Registration Form भरें
एक नया page खुलेगा जहां registration form होगा। निम्नलिखित fields carefully भरें:
Field 1: Staff Employee ID / Staff NIC-SD ID
- अपनी unique staff ID enter करें
- यह ID आपको school records में मिलेगी
- Double-check करें कि number सही है
Field 2: Staff Name
- अपना पूरा नाम exactly वैसा ही type करें जैसा Shala Darpan database में है
- Spelling mistakes न हों
- Name format: First Name Middle Name Last Name
Field 3: Date of Birth
- अपनी जन्मतिथि select करें
- Format: DD/MM/YYYY
- वही date दें जो official records में है
Field 4: Mobile Number
- 10-digit mobile number enter करें
- यह वही number होना चाहिए जो department में registered है
- यह number active होना चाहिए क्योंकि OTP इसी पर आएगा
Field 5: Email ID (Optional)
- अगर है तो valid email ID enter करें
- Future communications के लिए useful है
Field 6: Captcha Code
- Screen पर displayed characters को carefully type करें
- Case-sensitive है (capital और small letters का ध्यान रखें)
- अगर clearly नहीं दिख रहा, तो refresh icon पर click करके new captcha generate करें
स्टेप 5: Form Submit करें
- सभी fields एक बार फिर से check करें
- “Submit” या “सबमिट करें” button पर click करें
- Form process होने में कुछ seconds लगेंगे
स्टेप 6: Details Verification
- Submit करने के बाद एक confirmation page खुलेगा
- इस page पर आपकी सभी भरी हुई details display होंगी
- बहुत ध्यान से सभी information check करें:
- Name सही है?
- Date of Birth सही है?
- Mobile number सही है?
- Staff ID सही है?
- अगर कुछ गलत है तो “Back” या “Edit” option से वापस जाएं और correct करें
- अगर सब सही है तो “Confirm” button पर click करें
स्टेप 7: OTP Verification
- Confirmation के बाद आपके registered mobile number पर एक 6-digit OTP (One Time Password) भेजा जाएगा
- यह OTP usually 2-3 minutes में आता है
- अगर नहीं आया तो “Resend OTP” option use करें
OTP Process:
- Screen पर एक OTP input box दिखेगा
- अपने mobile पर received OTP को carefully type करें
- “Validate” या “Verify” button पर click करें
ध्यान दें:
- OTP generally 10 minutes के लिए valid होता है
- 3 बार गलत OTP डालने पर process lock हो सकता है
- OTP किसी के साथ share न करें
स्टेप 8: Login Credentials प्राप्त करें
- Successful OTP verification के बाद:
- Screen पर आपकी Login ID (Username) display होगी
- यह usually आपकी Staff ID based होती है
- आपके mobile number पर एक SMS आएगा जिसमें Password होगा
Important:
- Login ID को note कर लें या screenshot ले लें
- Password SMS को delete न करें
- Password को safely store करें
स्टेप 9: First Time Login
- अब आप login page पर जा सकते हैं
- अपनी Login ID और received Password enter करें
- Successfully login हो जाएंगे
स्टेप 10: Password Change (Mandatory)
- First login के बाद system आपको password change करने के लिए prompt करेगा
- यह security के लिए जरूरी है
- एक strong password choose करें:
- कम से कम 8 characters
- Capital और small letters mix करें
- Numbers include करें
- Special characters (@, #, $, etc.) add करें
- Example: Raj@School2025
Registration में आने वाली Common Problems और Solutions:
Problem 1: “Invalid Staff ID” Error Solution:
- Staff ID दोबारा check करें
- Leading zeros include करना न भूलें (जैसे 0012345)
- School office से correct ID confirm करें
**Problem 2: Mobile Number Not Registered Solution:
- अपने principal या block office में contact करें
- Mobile number database में update करवाएं
- 24-48 hours wait करें
- फिर registration try करें
**Problem 3: OTP नहीं आ रहा Solution:
- Network connection check करें
- 2-3 minutes wait करें
- “Resend OTP” option use करें
- SMS inbox और spam folder check करें
Problem 4: “Name Mismatch” Error Solution:
- Name exactly वैसा ही type करें जैसा records में है
- Extra spaces remove करें
- Spelling carefully check करें
Problem 5: Date of Birth Not Matching Solution:
- Service book में अपनी DOB verify करें
- Correct format (DD/MM/YYYY) use करें
- अगर database में गलत है तो office में update करवाएं
Registration Success के बाद Next Steps:
✓ Profile Complete करें – सभी additional information भरें ✓ Contact Details Update करें – email, alternate phone ✓ Explore Features – सभी available services देखें ✓ Notification Settings – important alerts enable करें ✓ Bookmark Page – easy access के लिए
Shala Darpan Staff Login – लॉगिन प्रक्रिया
एक बार registration successfully complete हो जाने के बाद, Shala Darpan Staff Window में login करना बहुत आसान है।
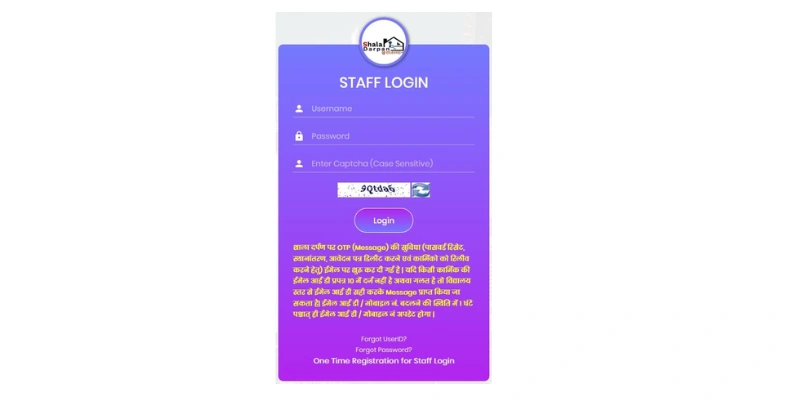
Login करने की Step-by-Step Process:
स्टेप 1: Portal खोलें
- अपने browser में rajshaladarpan.nic.in type करें
- Homepage load होने दें
स्टेप 2: Staff Login Link
- Homepage पर “Staff Login” या “स्टाफ लॉगिन” option देखें
- इस link पर click करें
- Login page खुल जाएगा
स्टेप 3: Login Credentials Enter करें
Login Form में तीन fields होंगे:
1. Username / Login ID
- अपनी registration के समय मिली Login ID enter करें
- यह generally आपकी Staff ID या unique username होती है
- Carefully type करें, spelling mistakes न हों
2. Password
- अपना password enter करें
- अगर आपने password change किया है तो new password use करें
- अगर नहीं change किया तो SMS में मिला original password use करें
- Password hidden characters में दिखेगा (****)
- आप “Show Password” eye icon पर click करके देख सकते हैं
3. Captcha Code
- Screen पर displayed characters को carefully type करें
- Capital और small letters का ध्यान रखें
- Numbers और letters को clearly distinguish करें
- अगर clearly नहीं दिख रहा तो refresh icon पर click करें
स्टेप 4: Login Button Click करें
- सभी fields fill करने के बाद
- “Login” या “लॉगिन करें” button पर click करें
- System आपकी credentials verify करेगा
स्टेप 5: Dashboard Access
- Successful login के बाद आप Staff Dashboard पर पहुंच जाएंगे
- यहां आपको विभिन्न options और services दिखेंगे
Staff Dashboard की Main Features:
Login करने के बाद आपको dashboard पर मिलेंगे:
1. Profile Section
- आपकी photo और basic details
- Name, Designation, School name
- Quick profile edit option
2. Quick Links
- Attendance marking
- Leave application
- Salary slips
- Important notifications
3. Notifications Panel
- Latest circulars
- Important announcements
- Pending tasks
- Reminders
4. Reports Section
- Student reports
- Attendance reports
- Academic reports
5. Services Menu
- सभी available services की list
- Transfer information
- Training programs
- Awards applications
Login Security Tips:
🔒 अपना Account Secure रखने के लिए:
- Strong Password Use करें
- Regular intervals में password change करें
- आसान passwords (123456, password, etc.) avoid करें
- Personal information (name, DOB) password में न रखें
- Login Credentials Safe रखें
- Password किसी के साथ share न करें
- Public computers पर “Remember Me” option use न करें
- Login details को written form में safely store करें
- Session Management
- काम खत्म होने के बाद properly logout करें
- Inactive sessions automatically timeout होते हैं (usually 15-20 minutes)
- Multiple devices से simultaneously login avoid करें
- Phishing से बचें
- केवल official website (rajshaladarpan.nic.in) पर ही login करें
- Suspicious emails या messages से मिले links पर click न करें
- कोई भी fake website या third-party app use न करें
- Two-Factor Authentication
- अगर available हो तो OTP-based login enable करें
- Mobile number always updated रखें
Login में Problems और Solutions:
समस्या 1: “Invalid Username or Password” Error
कारण:
- Username या Password गलत typed
- Caps Lock on है
- Space accidentally enter हो गया
समाधान:
- Username और Password carefully re-type करें
- Caps Lock off करें
- Copy-paste avoid करें (manually type करें)
- Password field में “Show Password” option use करके check करें
समस्या 2: Password भूल गए
समाधान:
- Login page पर “Forgot Password” link पर click करें
- अपनी Staff ID enter करें
- Registered mobile number पर OTP आएगा
- OTP verify करके new password set करें
- अगर mobile number भी change हो गया है तो block office में contact करें
समस्या 3: “Account Locked” Message
कारण:
- Multiple times गलत password enter किया
समाधान:
- कुछ time wait करें (usually 30 minutes)
- Helpline number पर contact करें
- Block education officer से account unlock करवाएं
समस्या 4: Captcha Error
समाधान:
- Captcha को carefully देखें और type करें
- Case-sensitive है (capital और small letters का ध्यान रखें)
- Confusing characters (0 और O, 1 और l) को ध्यान से देखें
- Refresh icon click करके new captcha generate करें
समस्या 5: Page Not Loading या Slow Response
समाधान:
- Internet connection check करें
- Browser refresh (F5) करें
- Browser cache clear करें
- Different browser try करें (Chrome, Firefox)
- Peak hours (10 AM – 2 PM) avoid करें
समस्या 6: “Session Expired” Message
कारण:
- Long time से inactive रहे
समाधान:
- Simply re-login करें
- Active session के दौरान regular intervals पर कोई activity करते रहें
Login के बाद First Time Tasks:
जब आप पहली बार successfully login करें तो ये काम जरूर करें:
✓ Complete Profile
- सभी mandatory fields fill करें
- Photo upload करें
- Contact details verify करें
✓ Change Default Password
- Strong password set करें
- Security question add करें
✓ Update Mobile & Email
- Current mobile number verify करें
- Valid email ID add करें
✓ Explore Dashboard
- सभी menu options देखें
- Available services को समझें
✓ Check Notifications
- Pending tasks देखें
- Important circulars पढ़ें
✓ Enable Notifications
- SMS alerts enable करें
- Email notifications set करें
Different Login Types:
1. Staff Login (Staff Members के लिए)
- Teachers
- Administrative staff
- Support staff
2. Office Login (Principals/Headmasters के लिए)
- School heads
- Additional privileges
- Administrative access
3. Nodal Officer Login (Block level officers के लिए)
- Block education officers
- Monitoring access
- Approval authorities
प्रत्येक login type के लिए different credentials और access levels होते हैं।
Mobile पर Login कैसे करें:
Shala Darpan portal mobile-friendly है। Mobile browser में login करने के लिए:
- Mobile browser (Chrome, Firefox) खोलें
- rajshaladarpan.nic.in type करें
- Desktop site पर automatically mobile view load होगा
- Same login process follow करें
- Responsive design के कारण सभी features mobile पर भी accessible हैं
Pro Tip: Better experience के लिए landscape mode use करें।
Staff Window के माध्यम से Attendance Management
Attendance marking staff window की एक crucial feature है। आइए विस्तार से समझें:
Daily Attendance Marking:
Process:
- Staff dashboard में login करें
- “Attendance” या “उपस्थिति” section में जाएं
- Current date select करें (usually auto-selected)
- अपनी attendance status select करें:
- Present (उपस्थित)
- Absent (अनुपस्थित)
- On Leave (छुट्टी पर)
- On Duty (कार्यरत अन्यत्र)
- If applicable, add remarks
- “Submit” button click करें
- Confirmation message आएगा
Attendance के प्रकार:
1. Regular Attendance (सामान्य उपस्थिति)
- Normal working days की attendance
- Daily basis पर mark होती है
2. Leave Attendance (छुट्टी उपस्थिति)
- Approved leaves automatically mark होती हैं
- Leave type display होता है
3. On Duty Attendance
- Official tours
- Training programs
- Meetings
- Government work
4. Late Attendance
- Late arrivals
- Permission के साथ
Attendance Reports:
Monthly Report:
- पूरे महीने की attendance summary
- Present/Absent days count
- Leave days
- Percentage calculation
Quarterly और Annual Reports भी generate कर सकते हैं।
Leave Management System – छुट्टी प्रबंधन
Staff Window के through leave management बहुत convenient हो गई है।
Leave के प्रकार:
1. Casual Leave (CL)
- साल में usually 10-12 days
- Short duration के लिए
- आम जरूरतों के लिए
2. Earned Leave (EL) / Privilege Leave
- लंबी छुट्टियों के लिए
- Accumulate होती है
- Maximum limit होती है
3. Medical Leave
- बीमारी के लिए
- Medical certificate required (certain days के बाद)
4. Maternity Leave
- Female employees के लिए
- 180 days तक
- Documentation required
5. Paternity Leave
- Male employees के लिए
- Usually 15 days
6. Special Leave
- Particular circumstances के लिए
- Approval based
Online Leave Application Process:
स्टेप 1: Staff Window में login करें
स्टेप 2: “Leave Management” या “छुट्टी प्रबंधन” section में जाएं
स्टेप 3: “Apply for Leave” या “छुट्टी के लिए आवेदन” option select करें
स्टेप 4: Leave application form में details भरें:
- Leave type select करें
- Start date choose करें
- End date select करें
- Number of days (auto-calculate होगी)
- Reason for leave (विस्तार से)
- Emergency contact (if applicable)
स्टेप 5: Supporting documents upload करें (if required)
स्टेप 6: “Submit” button click करें
स्टेप 7: Application status track करें
Leave Balance Check करना:
Dashboard पर आपको दिखेगा:
- Total leave entitlement
- Leave availed
- Leave balance
- Pending applications
Transfer Information और Process
Transfer staff life का एक important aspect है। Staff Window में सभी transfer related information available है।
Transfer Cycle Information:
Regular Transfer Cycles:
- Usually हर 2-3 साल में
- Fixed schedule के according
- Online application system
Special Transfers:
- Exceptional cases
- Medical grounds
- Administrative needs
Transfer Application Process:
Online Transfer Application:
- Transfer notification आने का wait करें
- Staff Window में “Transfer” section में जाएं
- “Apply for Transfer” option select करें
- Personal details verify करें
- Current posting details check करें
- Preferred locations select करें (priority wise):
- First preference
- Second preference
- Third preference
- Transfer grounds mention करें:
- Family reasons
- Medical reasons
- Personal reasons
- Supporting documents upload करें
- Declaration agree करें
- Submit application
- Acknowledgement slip print/save करें
Transfer Orders देखना:
- “Transfer Orders” section में जाएं
- अपना order search करें (by name, staff ID, या order number)
- Order PDF download करें
- Joining formalities के लिए prepare करें
Frequently Asked Questions – अक्सर पूछे जाने वाले प्रश्न
Shala Darpan Staff Window क्या है?
Shala Darpan Staff Window एक specialized online portal है जो राजस्थान के सरकारी स्कूलों के teachers और staff members के लिए बनाया गया है। इस portal के माध्यम से staff अपने professional कार्यों को digitally manage कर सकते हैं जैसे कि attendance marking, leave application, profile management, salary slips देखना, transfer information check करना आदि। यह portal शिक्षा विभाग द्वारा संचालित है और इसका उद्देश्य administrative processes को streamline करना और paperwork को कम करना है।
Shala Darpan Staff Window में लॉगिन कैसे करें?
Staff Window में login करने के लिए सबसे पहले आपको registration करना जरूरी है। Registration के बाद आपको Login ID और Password मिलेगा। Login करने के लिए:
rajshaladarpan.nic.in website पर जाएं
“Staff Login” option पर click करें
अपनी Login ID/Username enter करें
Password type करें
Captcha code fill करें
“Login” button पर click करें
Successful login के बाद आप Staff Dashboard पर पहुंच जाएंगे जहां सभी services available होंगी। पहली बार login करने पर आपको password change करने के लिए कहा जाएगा।
अपना Staff NIC-SD ID कैसे खोजें?
Staff NIC-SD ID खोजने के लिए:
Shala Darpan portal पर जाएं
“Staff Window” में जाएं
“Know Staff Details” या “Know Staff NIC-SD ID” option select करें
अपने School NIC-SD ID enter करें
Captcha code fill करें
“Go” button click करें
आपके school के सभी staff members की list दिखेगी जिसमें प्रत्येक की Staff NIC-SD ID होगी
आप इस list में अपना name search
क्या Shala Darpan Staff Window से छुट्टी आवेदन किया जा सकता है?
हाँ, बिल्कुल! Shala Darpan Staff Window के माध्यम से आप online leave application submit कर सकते हैं। Process है:
Staff Window में login करें
“Leave Management” या “छुट्टी प्रबंधन” section में जाएं
“Apply for Leave” option select करें
Leave type (CL, EL, Medical, etc.) choose करें
Start और end date select करें
Leave reason विस्तार से लिखें
यदि जरूरी हो तो documents upload करें
Application submit करें
आप अपनी leave balance भी check कर सकते हैं और pending applications की status track कर सकते हैं। Leave approval आपके principal या concerned authority द्वारा online ही होगी।
Staff Window में registration के लिए क्या documents चाहिए?
Staff Window में registration के लिए आपको निम्नलिखित information की जरूरत होगी:
Staff Employee ID या Staff NIC-SD ID
Full name (जैसा official records में है)
Date of Birth
Mobile number (जो department में registered है)
Email ID (optional लेकिन recommended)
Physical documents upload करने की जरूरत नहीं है registration के समय। बस यह information सही होनी चाहिए जो department के database में है। Registration के बाद OTP verification के लिए mobile number active होना जरूरी है।
Password भूल जाने पर क्या करें?
अगर आप अपना password भूल गए हैं तो:
Login page पर “Forgot Password” link पर click करें
अपनी Staff ID enter करें
Registered mobile number verify करें
Mobile पर OTP आएगा
OTP enter करें
New password set करें
Password confirm करें
Submit करें
नया password set होने के
क्या Staff Window mobile पर accessible है?
हाँ, Shala Darpan Staff Window पूरी तरह से mobile-friendly है। आप अपने smartphone के browser में rajshaladarpan.nic.in खोल सकते हैं और सभी features access कर सकते हैं। Responsive design के कारण page automatically mobile screen के according adjust हो जाता है। हालांकि official mobile app नहीं है, लेकिन mobile browser में website smoothly काम करती है। Better experience के लिए landscape mode use करें।
Salary slip कैसे download करें?
Salary slip download करने के लिए:/
Staff Window में login करें
Dashboard में “Salary” या “वेतन” section खोजें
“Download Salary Slip” option select करें
Month और Year select करें
“Download” या “View” button click करें
PDF format में salary slip open होगी
इसे save या print कर सकते हैं
आप previous months की salary slips भी access कर सकते हैं। Salary slips में basic pay, allowances, deductions और net salary की detailed information होती है।
Transfer के लिए कब apply कर सकते हैं?
Transfer के लिए application केवल तभी submit कर सकते हैं जब department द्वारा official transfer notification जारी किया जाए। Usually हर 2-3 साल में regular transfer cycle होता है। Notification में mention होता है:
Application start date
Last date to apply
Eligibility criteria
Required documents
Special circumstances में (medical emergency, आदि) आप off-cycle transfer के लिए भी apply कर सकते हैं लेकिन उसके लिए proper justification और documents required होते हैं।
निष्कर्ष – Conclusion
Shala Darpan Staff Window राजस्थान के शिक्षकों और school staff के लिए एक revolutionary tool है। यह portal न केवल administrative processes को simplify करता है बल्कि transparency और efficiency भी बढ़ाता है।