क्या आप राजस्थान के किसी government school में teacher या staff member हैं? क्या आपको Shala Darpan Registration करना है लेकिन समझ नहीं आ रहा कहां से शुरू करें? तो यह comprehensive guide आपके लिए है!
इस detailed article में हम आपको Shala Darpan Registration की पूरी process step-by-step बताएंगे। साथ ही School Login ID कैसे खोजें, NIC-SD ID क्या है, registration में क्या problems आ सकती हैं और उनके solutions भी देंगे।
Shala Darpan Registration क्या है? – विस्तृत परिचय
Shala Darpan Registration एक one-time process है जिसके through राजस्थान के government schools के staff members (teachers, principals, और अन्य employees) अपना account बनाते हैं Shala Darpan Portal पर।
Registration का मतलब:
Simple Terms में: Registration का मतलब है कि आप Shala Darpan Portal पर अपनी digital identity create करते हैं। यह process एक बार करनी होती है, उसके बाद आप बस login करके सभी services use कर सकते हैं।
Technical Definition: यह एक authentication process है जिसमें staff member अपनी official details verify करवाते हैं और unique login credentials (Username & Password) प्राप्त करते हैं जिससे वे portal की restricted services access कर सकें।
Registration क्यों जरूरी है?
1. Portal Access के लिए
- बिना registration के आप Staff Window access नहीं कर सकते
- Login-based services use नहीं कर सकते
- Personal dashboard नहीं देख सकते
2. Official Identity Verification
- आपकी identity department के database में verify होती है
- Authorized access मिलती है
- Security maintain होती है
3. Professional Work के लिए
- Attendance mark करने के लिए
- Leave application submit करने के लिए
- Salary slips देखने के लिए
- Transfer applications के लिए
- Official correspondence के लिए
4. Accountability
- आपके सभी actions tracked होते हैं
- Transparency maintain होती है
- Proper audit trail बनता है
Registration के बाद क्या-क्या कर सकते हैं?
Registered Users को Access:
A. Personal Management
- Profile update और management
- Contact details change
- Photo upload
- Educational qualifications update
- Experience details maintain
B. Attendance System
- Daily attendance mark करना
- Leave applications submit करना
- Attendance history देखना
- Leave balance check करना
- Monthly attendance reports
C. Professional Services
- Salary slips download
- Income certificates
- Service certificates
- Transfer applications
- Training registrations
D. Academic Work
- Student data entry
- Exam results upload
- Performance reports
- Academic calendar access
- Scheme implementations
E. Communication
- Official notifications receive करना
- Circulars देखना
- Announcements पढ़ना
- Alerts और reminders
- Department correspondence
Shala Darpan Portal पर कौन-कौन Registration कर सकता है?
यह बहुत important question है। आइए विस्तार से समझें।
Eligible Persons for Registration:
1. Teaching Staff (शिक्षण स्टाफ)
A. Regular Teachers
- Primary school teachers
- Upper primary teachers
- Secondary school teachers
- Senior secondary teachers
- Subject teachers (all subjects)
- Language teachers
- Physical education teachers
- Art teachers
B. Principals और Headmasters
- School heads
- Vice principals
- Acting principals
- In-charge headmasters
C. Special Educators
- Resource teachers
- Special education teachers
- Remedial teachers
- Inclusive education coordinators
2. Non-Teaching Staff (गैर-शिक्षण स्टाफ)
A. Administrative Staff
- Clerks
- Office assistants
- Data entry operators
- Accountants
- Cashiers
B. Support Staff
- Lab assistants
- Library assistants
- Computer operators
- Store keepers
- Attendants
C. Other Staff
- Peons
- Watchmen
- Gardeners
- Sweepers
- Cooks (mid-day meal)
3. Block और District Level Officers
A. Block Level
- Block Education Officers (BEO)
- Block Resource Coordinators (BRC)
- Cluster Resource Coordinators (CRC)
- Block MIS coordinators
B. District Level
- District Education Officers (DEO)
- District Project Coordinators
- District MIS officers
- Subject inspectors
4. Special Categories
A. Guest Teachers
- Contractual teachers
- Temporary teachers
- Guest faculty
- Visiting teachers
B. Interns
- B.Ed interns
- D.El.Ed interns
- Training period teachers
- Probationary staff
कौन Registration नहीं कर सकता?
Not Eligible:
- ✗ Private school staff (उनके लिए अलग portal है)
- ✗ Students (उनके लिए different login है)
- ✗ Parents (Citizen Window use करें)
- ✗ Retired staff (जब तक special permission न हो)
- ✗ Non-department employees
Registration के लिए Basic Requirements:
Mandatory Requirements:
1. Employment Status
- राजस्थान education department में employed होना चाहिए
- Valid appointment order होना चाहिए
- Active service में होना चाहिए
- Posted in a government या aided school
2. Official Records
- Department database में entry होनी चाहिए
- Staff ID assigned होनी चाहिए
- School में officially posted होना चाहिए
- HR records में name होना चाहिए
3. Required Information
- Staff Employee ID या Staff NIC-SD ID
- Name (exactly as per records)
- Date of Birth (official DOB)
- Mobile number (registered with department)
- School NIC-SD ID
4. Technical Requirements
- Active mobile number
- Internet connection
- Email ID (recommended)
- Computer/smartphone access
Shala Darpan Registration Process – विस्तृत प्रक्रिया
अब आइए step-by-step समझें कि registration कैसे करें।
Pre-Registration Checklist:
Before Starting, Ensure You Have:
Staff ID Ready
- Staff Employee ID या
- Staff NIC-SD ID
- यह ID आपको school records में मिलेगी
Personal Information
- Full name (as per service book)
- Date of birth (DD/MM/YYYY format)
- Father’s/Husband’s name
- Gender
Contact Details
- Active mobile number (10 digits)
- यह number department में registered होना चाहिए
- Email ID (optional but recommended)
School Information
- School NIC-SD ID
- School name
- Current posting details
Documents for Verification
- Service book (reference के लिए)
- Appointment order
- Last posting order
- ID proof
Technical Setup
- Good internet connection
- Updated web browser
- Mobile network active (OTP के लिए)
Step-by-Step Registration Process:
स्टेप 1: Portal Access करें
Website खोलना:
- Browser Open करें
- Chrome, Firefox, या Edge (recommended browsers)
- Private/Incognito mode avoid करें
- Cookies और JavaScript enable रखें
- Official Website पर जाएं
- Address bar में type करें: rajshaladarpan.nic.in
- Enter press करें
- Homepage load होने का wait करें
- Bookmark कर लें future use के लिए
- Website Verify करें
- URL में “rajshaladarpan.nic.in” confirm करें
- Government website है verify करें
- Fake websites से बचें
Important Security Note:
- केवल official website पर ही जाएं
- http:// या https:// दोनों काम करते हैं
- Third-party websites से registration न करें
स्टेप 2: Staff Window Access करें
Navigation Process:
- Homepage पर
- Page को scroll down करें
- Menu options देखें
- “Staff Window” या “स्टाफ विंडो” खोजें
- Staff Window Click करें
- Button/Link पर click करें
- New page load होगा
- Shala Darpan : Staff Corner homepage खुलेगा
- Verify Landing Page
- “Staff Corner” heading confirm करें
- Various options visible होंगे
- Registration link उपलब्ध होगा
Alternative Method:
- Direct URL use करें: rajshaladarpan.nic.in/staff
- या homepage पर “Login” menu में “Staff Login” होगा
- वहां से “New Registration” link मिलेगा
स्टेप 3: Registration Link खोजें
Registration Option को Locate करना:
- Staff Window Page पर
- Available options की list देखें
- Options में शामिल होंगे:
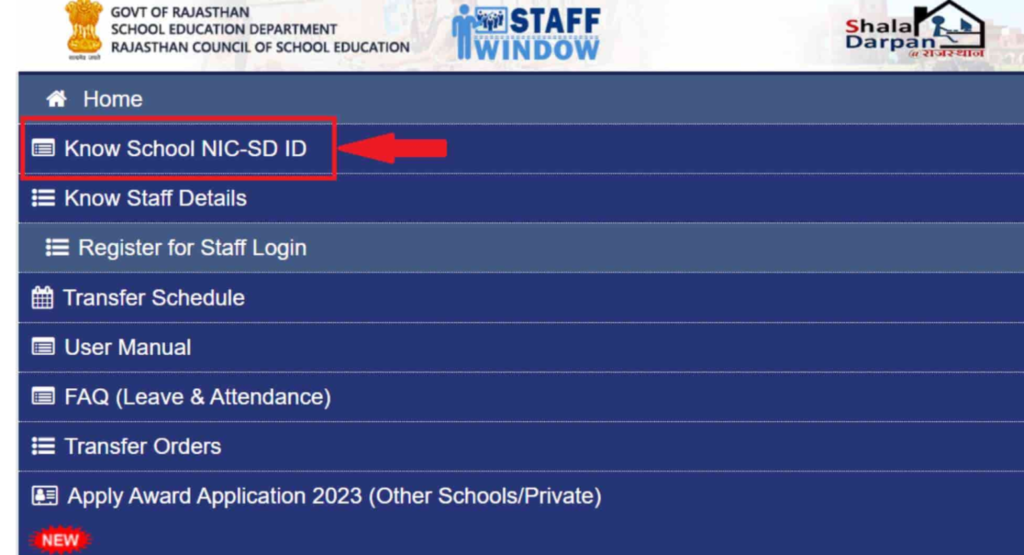
- Know School NIC-SD ID
- Know Staff Details
- Register for Staff Login ← यह option
- Staff Login
- Transfer Schedule
- Others
- Registration Link पर Click करें
- “Register for Staff Login” पर click करें
- या “स्टाफ लॉगिन के लिए पंजीकरण” (Hindi में)
- या “New Registration” या “Sign Up”
- Registration Form Page खुलेगा
- Form fields visible होंगे
- Instructions पढ़ें
- Form भरने के लिए ready रहें
Common Variations: Different pages पर link names slightly different हो सकते हैं:
- “Register for Staff Login”
- “Staff Registration”
- “New Staff Registration”
- “Sign Up for Staff”
- सभी same page पर lead करते हैं
स्टेप 4: Registration Form भरें
Detailed Form Filling Guide:
अब आप registration form page पर हैं। Form में कई fields होंगे जिन्हें carefully भरना है।
Field 1: Staff Employee ID / Staff NIC-SD ID
What to Enter:
- अपनी unique staff identification number
- यह usually 8-10 digit number होता है
- Example: 12345678 या RAJ12345678
Where to Find:
- Service book में
- Salary slip पर
- Last appointment/posting order में
- School records में
- Payroll system में
Important Tips:
- Leading zeros include करें (जैसे 00123456)
- Spaces न दें
- Special characters न दें
- Exact number enter करें
- Double-check करें
Common Mistakes to Avoid:
- Employee ID और Staff ID confuse न करें
- School ID न डालें
- Personal mobile number न डालें
- Rough estimate न करें – exact number चाहिए
Field 2: Staff Name (Full Name)
How to Enter:
- Exactly वैसा ही name जैसा department records में है
- सभी name parts include करें
- Spelling absolutely correct होनी चाहिए
Format:
- First Name, Middle Name, Last Name
- Example: राम कुमार शर्मा
- या: RAMESH KUMAR SHARMA
Tips:
- Service book देखकर लिखें
- Extra spaces न दें
- Special characters avoid करें (जैसे Dr., Mr., Mrs.)
- All caps या proper case – consistent रखें
Common Issues:
- Name में typo errors
- Middle name miss होना
- Surname order गलत होना
- Hindi/English format confusion
Field 3: Date of Birth
Format Required:
- DD/MM/YYYY
- Example: 15/08/1985
How to Enter:
- Calendar icon पर click करें और date select करें
- या manually type करें
- Official service records के according
Important:
- यह वही DOB होनी चाहिए जो department में registered है
- Birth certificate की DOB न हो तो problem हो सकती है
- Service book में जो है वही use करें
Verification:
- Service book check करें
- Appointment letter verify करें
- Aadhaar card (if same DOB है)
Field 4: Mobile Number
What to Provide:
- 10-digit mobile number
- Example: 9876543210
- यह number active होना चाहिए
Critical Requirement: यह वही mobile number होना चाहिए जो department में आपके records में registered है
Why Important:
- OTP इसी number पर आएगा
- Future communications के लिए
- Password recovery के लिए
- Alerts और notifications के लिए
If Number Not Registered:
- अपने principal से मिलें
- Mobile number update करवाने के लिए application दें
- Block education office में update करवाएं
- 24-48 hours wait करें
- फिर registration try करें
Tips:
- Country code (+91) न लिखें
- Spaces या dashes न दें
- Correct number दो बार verify करें
- Number active है ensure करें
Field 5: Email ID (Optional)
Email Address:
- Valid email ID enter करें
- Example: example@gmail.com
- Optional है लेकिन highly recommended
Why Recommended:
- Important communications receive होंगे
- Password recovery easier होगी
- Documents email पर आएंगे
- Future में mandatory हो सकता है
Tips:
- Active email use करें
- Professional email better है
- Spam folder regularly check करें
- Email access बना रहे
Field 6: Captcha Code
Security Verification:
- Screen पर characters displayed होंगे
- उन्हें exactly type करें
- Case-sensitive है
How to Enter:
- Carefully characters देखें
- Capital और small letters distinguish करें
- Numbers और letters clearly identify करें
- एक साथ type करें, spaces नहीं
If Not Clear:
- Refresh icon पर click करें
- New captcha generate होगा
- Zoom in करके देखें
- 2-3 attempts में सही हो जाना चाहिए
स्टेप 5: Form Verification और Submit
Before Submitting:
1. Complete Form Review करें:
- सभी fields filled हैं?
- कोई field blank तो नहीं?
- Required fields (*) marked सभी भरे हैं?
2. Accuracy Check करें:
Staff ID:
- Correct ID entered है?
- Leading zeros included हैं?
- No extra characters?
Name:
- Spelling absolutely correct?
- Order सही है?
- Service book के according?
Date of Birth:
- Format correct है (DD/MM/YYYY)?
- Official DOB entered है?
- Date reasonable है?
Mobile Number:
- 10 digits हैं?
- Department में registered number है?
- Currently active है?
Captcha:
- Correctly typed?
- Case matches?
3. Submit Button Click करें:
- “Submit” या “सबमिट करें” button पर click करें
- Single click करें (double click न करें)
- Processing का wait करें
- Page reload न करें
स्टेप 6: Confirmation Page Verify करें
Submission के बाद:
1. Confirmation Page खुलेगा
- आपकी सभी entered details display होंगी
- Carefully सब कुछ review करें
- यह last chance है corrections के लिए
2. Displayed Information Verify करें:
Check करें:
- Staff ID सही दिख रही है?
- Name correct है?
- DOB सही है?
- Mobile number सही है?
- School details correct हैं?
3. Actions:
If Everything is Correct:
- “Confirm” button पर click करें
- या “I Agree” checkbox tick करें
- “Proceed” या “Next” पर click करें
If Something is Wrong:
- “Edit” या “Back” button पर click करें
- Form पर वापस जाएं
- Corrections करें
- फिर से submit करें
Important Note: एक बार confirm करने के बाद आप details change नहीं कर सकते। इसलिए बहुत carefully verify करें।
स्टेप 7: OTP Verification
Mobile Verification Process:
1. OTP Request:
- Confirm button click करने के बाद
- System आपके mobile number पर OTP भेजेगा
- Message में “OTP sent” confirmation आएगा
2. OTP Receive करें:
- अपने mobile पर SMS check करें
- 6-digit OTP होगा
- Example: 123456
- Usually 1-3 minutes में आता है
3. OTP Enter करें:
- Screen पर OTP input box होगा
- 6 digits carefully type करें
- Spaces न दें
- सभी digits एक साथ enter करें
4. Validate Button Click करें:
- “Validate OTP” या “Verify” button पर click करें
- System OTP verify करेगा
- Processing message दिखेगा
OTP Validity:
- OTP usually 10 minutes के लिए valid होता है
- Expired हो जाए तो “Resend OTP” use करें
- Maximum 3 attempts मिलते हैं
If OTP Not Received:
Wait करें:
- 2-3 minutes wait करें
- Network delay हो सकती है
Check करें:
- SMS inbox thoroughly check करें
- Spam/Junk folder भी देखें
- Blocked messages check करें
Resend Option:
- “Resend OTP” button पर click करें
- New OTP भेजा जाएगा
- पहले वाला OTP invalid हो जाएगा
Still Not Received:
- Mobile number सही है verify करें
- Network connection check करें
- Airplane mode off करें
- Different location try करें
- Phone restart करें
Common OTP Issues:
Problem 1: Wrong OTP Error
- Carefully दोबारा type करें
- Copy-paste न करें
- All 6 digits include करें
- Expired तो नहीं हो गया
Problem 2: OTP Expired
- “Resend OTP” पर click करें
- Fresh OTP generate होगा
- Quickly enter करें
Problem 3: Maximum Attempts Exceeded
- थोड़ी देर wait करें (15-30 minutes)
- फिर try करें
- या helpline पर contact करें
स्टेप 8: Login Credentials प्राप्त करें
Successful Verification के बाद:
1. Success Message:
- “Registration Successful” message display होगा
- Congratulations message
- “Your account has been created” confirmation
2. Login ID Display:
- Screen पर आपकी Username/Login ID show होगी
- यह usually आपकी Staff ID based होती है
- Example: STAFF12345 या similar format
What to Do:
- Screenshot ले लें
- Notebook में note कर लें
- Photo click कर लें
- Email पर send कर दें (खुद को)
3. Password SMS:
- आपके registered mobile number पर SMS आएगा
- SMS में Password होगा
- यह auto-generated password होता है
- Example: Ab@12345 या similar
SMS Format Usually:
Dear User,
Your Shala Darpan registration is successful.
Login ID: STAFF12345
Password: Ab@12345
Please login and change your password.
- Rajasthan Education Dept
4. SMS को Save करें:
- SMS delete न करें
- Screenshot save करें
- Password note कर लें safely
- Backup लें
Important Instructions with Credentials:
- पहली बार login करने के बाद password change करना mandatory है
- Security के लिए password किसी के साथ share न करें
- Login credentials safely store करें
स्टेप 9: First Time Login
अब आप Login कर सकते हैं:
1. Login Page पर जाएं:
- Staff Window > Staff Login
- या Direct: rajshaladarpan.nic.in/StaffLogin
2. Credentials Enter करें:
- Username: जो screen पर मिली थी
- Password: जो SMS में आया था
- Captcha Code: screen पर displayed
3. Login Button Click करें:
- “Login” पर click करें
- System verify करेगा
- Dashboard load होगा
4. First Login Experience:
- Welcome message मिलेगा
- Quick tutorial दिख सकता है
- Dashboard features visible होंगे
स्टेप 10: Mandatory Password Change
Security Requirement:
1. Change Password Prompt:
- First login पर automatically prompt आएगा
- “You must change your password” message
- Password change form display होगा
2. Password Change Form:
Fields:
- Old Password: SMS में मिला password
- New Password: अपना strong password बनाएं
- Confirm New Password: same password दोबारा
3. Strong Password बनाएं:
Requirements:
- Minimum 8 characters
- At least one capital letter (A-Z)
- At least one small letter (a-z)
- At least one number (0-9)
- At least one special character (@, #, $, %, etc.)
Examples of Strong Passwords:
- Raj@School2025
- Teach$r@12345
- MyPass#2025
- Edu_Raj@123
What to Avoid:
- Simple passwords like “password123”
- Personal info (name, DOB, phone)
- Dictionary words
- Repeated characters (111111, aaaaaa)
- Common patterns (123456, qwerty)
4. Submit New Password:
- All fields भरें
- “Submit” या “Change Password” click करें
- Success message confirm करें
5. Password Save करें:
- New password safely note करें
- याद रखें या secure place पर store करें
- किसी के साथ share न करें
Password Management Tips:
- Password manager app use करें
- Regular intervals में change करें
- Different passwords for different accounts
- Never share with anyone
School Login ID Search – स्कूल लॉगिन आईडी कैसे खोजें
Visit Shala Darpan Portal for School Login ID या School NIC-SD ID हर school की unique identification number है। Registration के लिए यह जानना जरूरी हो सकता है।
School ID खोजने की विधि:
Method 1: Staff Window से
Process:
स्टेप 1: Shala Darpan portal खोलें
स्टेप 2: “Staff Window” पर click करें
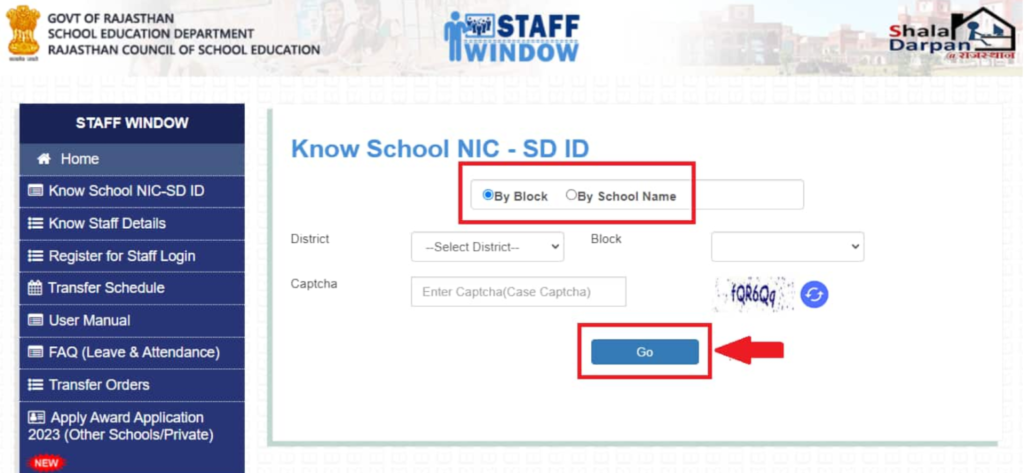
स्टेप 3: “Know School NIC-SD ID” option select करें
स्टेप 4: Search method choose करें:
Option A: By Block
- District select करें
- Block choose करें
- Captcha enter करें
- “Go” click करें
- उस block के सभी schools की list आएगी
Option B: By School Name
- School name के 4+ characters type करें
- Example: “Govt” या “Rajk” या “Senior”
- Captcha fill करें
- “Search” click करें
- Matching schools दिखेंगे
स्टेप 5: अपना school list में से खोजें
स्टेप 6: School NIC-SD ID column में ID दिखेगी
स्टेप 7: ID note कर लें
Method 2: Citizen Window से
Alternative Process:
स्टेप 1: Homepage पर “Citizen Window” click करें
स्टेप 2: “Search Schools” option select करें
स्टेप 3: Search parameters भरें:
- School type select करें
- District और Block choose करें
- या PIN code enter करें
स्टेप 4: Captcha fill करें और search करें
स्टेप 5: Results में School NIC-SD ID column होगा
Method 3: School Office से
Direct Approach:
- अपने school के principal office जाएं
- Administrative staff से School NIC-SD ID मांगें
- यह information school records में होती है
- Official letterhead पर भी printed होती है
- Note कर लें या copy मांगें
Method 4: Block Education Office से
Official Channel:
- अपने Block Education Office contact करें
- School name और location बताएं
- वे आपको School NIC-SD ID provide कर देंगे
- Phone, email या personal visit से पूछ सकते हैं
School ID की Important Details:
Format:
- Usually 8-10 digit number
- Example: 12345678 या similar
- Alphanumeric हो सकती है
Where Used:
- Staff registration में
- School login में
- Official correspondence में
- Reports और documents में
- Transfer applications में
Keep it Handy:
- अपने records में save रखें
- Mobile में note कर लें
- Email पर send कर दें
- Screenshot save करें
जानिए क्या है NIC-SD ID – विस्तृत जानकारी
NIC-SD ID Shala Darpan system में एक crucial identification number है। आइए विस्तार से समझें।
NIC-SD ID क्या है?
Full Form:
- NIC = National Informatics Centre
- SD = Shala Darpan
- ID = Identification Number
Definition: NIC-SD ID एक unique identification number है जो National Informatics Centre द्वारा allocate किया जाता है हर school और staff member को Shala Darpan system में।
NIC-SD ID के प्रकार:
1. School NIC-SD ID
- हर school को assign होती है
- School की unique identity
- All school-related activities में use होती है
- 8-10 digits का number
2. Staff NIC-SD ID
- हर staff member को assign होती है
- Individual की unique identity
- Personal और professional records से linked
- Staff के सभी transactions में use होती है
School NIC-SD ID की विशेषताएं:
Characteristics:
1. Uniqueness:
- राजस्थान के हर school की अलग ID
- कोई duplicate नहीं
- Permanently assigned
- Transfer होने पर भी same रहती है
2. Structure:
- Numeric या alphanumeric
- Standard format follow करती है
- System-generated होती है
- Manually assign नहीं की जाती
3. Linked Information: School NIC-SD ID से linked होता है:
- School name और address
- Infrastructure details
- Staff और student data
- Academic performance
- Financial transactions
- Scheme implementations
4. Usage: School NIC-SD ID use होती है:
- Staff registration में
- School login में
- Student admissions में
- Reports generation में
- Fund transfers में
- Official communications में
Staff NIC-SD ID की विशेषताएं:
Features:
1. Personal Identity:
- हर staff member की unique
- Career throughout same रहती है
- Department में permanent record
- All transactions से linked
2. Information Linked: Staff NIC-SD ID से जुड़ी होती है:
- Personal details (name, DOB, etc.)
- Professional information (qualification, experience)
- Posting history
- Salary और pay details
- Attendance records
- Leave history
- Transfer records
- Training details
- Performance data
3. Where Used:
- Registration process में
- Login credentials में
- Salary slips पर
- Service certificates में
- Transfer orders में
- Leave applications में
- Attendance marking में
4. How to Get: Staff NIC-SD ID मिलती है:
- Appointment के समय assign होती है
- Department database में entry होने पर
- Official posting order में mentioned होती है
- Service book में recorded होती है
NIC-SD ID कैसे खोजें?
For School NIC-SD ID: (पहले section में detailed process दी गई है)
For Staff NIC-SD ID:
Method 1: Online Search
- Staff Window > Know Staff Details
- School NIC-SD ID enter करें
- अपना name list में खोजें
- Staff NIC-SD ID column में मिलेगी
Method 2: Service Records
- Service book check करें
- Appointment order देखें
- Last salary slip पर होती है
- Posting order में mentioned
Method 3: School Office
- School के administrative section में जाएं
- Staff register में आपकी entry होगी
- वहां Staff NIC-SD ID mentioned होगी
Method 4: Block Office
- Block Education Office contact करें
- अपनी details provide करें
- वे आपको Staff NIC-SD ID बता देंगे
NIC-SD ID का महत्व:
Why Important:
1. Unique Identification:
- System में आपकी unique identity
- Confusion avoid होता है
- Same name वाले multiple persons distinguish हो सकते हैं
2. Data Integration:
- सभी records एक साथ linked
- Complete profile maintenance
- History tracking easy
- Comprehensive data access
3. Transaction Security:
- Secure authentication
- Authorized access only
- Audit trail maintained
- Fraud prevention
4. Operational Efficiency:
- Quick data retrieval
- Fast processing
- Reduced errors
- Streamlined workflows
Registration में आने वाली Common Problems और Solutions
Registration process में कुछ common issues आ सकती हैं। आइए उन्हें और their solutions देखें।
समस्या 1: “Invalid Staff ID” Error
कारण:
- Staff ID गलत entered
- Database में ID exist नहीं करती
- Leading zeros miss हो गए
- Typo error
समाधान:
- Service book से exact ID verify करें
- Leading zeros को include करें (जैसे 00123456)
- Carefully re-type करें
- School office से confirm करें
- अगर still problem है तो block office में contact करें
समस्या 2: “Mobile Number Not Registered” Error
कारण:
- Mobile number department database में नहीं है
- Recently join किए हों और update pending है
- Number change कर लिया लेकिन update नहीं किया
समाधान: Immediate:
- School principal से बात करें
- Mobile number update के लिए application दें
- Required documents submit करें:
- ID proof
- Mobile number proof
- Declaration letter
Process:
- Principal application forward करेंगे block office को
- Block office database update करेगा
- 24-48 hours में update हो जाएगा
- फिर registration try करें
Temporary Solution:
- अगर urgent है तो block office directly जाएं
- Same day update हो सकता है
- फिर immediately registration करें
समस्या 3: “Name Mismatch” Error
कारण:
- Entered name और database में name match नहीं कर रहे
- Spelling difference है
- Extra spaces या characters हैं
- Order different है (First/Last name)
समाधान:
- Service Book Check करें:
- Exactly वैसा ही name type करें
- Spelling carefully match करें
- No extra spaces
- Same order maintain करें
- Format Variations Try करें:
- राम कुमार शर्मा
- RAM KUMAR SHARMA
- Ramkumar Sharma
- R K Sharma
- Principal से Verify करें:
- Database में name क्या है पूछें
- Print-out लें if possible
- Exact format note करें
- If Still Not Working:
- Block office में complaint करें
- Name correction application दें
- Updated करवाएं
समस्या 4: “Date of Birth Mismatch”
कारण:
- Entered DOB database के DOB से match नहीं कर रही
- Service records में different DOB है
- Format issue है
समाधान:
- Service Book Verify करें:
- Official DOB क्या है check करें
- वही DOB use करें
- Format: DD/MM/YYYY
- Multiple Documents Check करें:
- Service book
- Appointment order
- Last salary slip
- Personnel file
- If Discrepancy है:
- DOB correction application दें
- Supporting documents attach करें:
- Birth certificate
- Educational certificates
- Aadhaar card
- Block office में submit करें
- Correction के बाद registration करें
समस्या 5: OTP नहीं आ रहा
समाधान: (पहले विस्तार से discuss किया गया है)
Quick Checklist:
- Mobile number correct entered है?
- Network connection proper है?
- Phone में sufficient balance है?
- SMS inbox full तो नहीं?
- Number blocked तो नहीं?
- Spam folder check किया?
Actions:
- 2-3 minutes wait करें
- Resend OTP try करें
- Phone restart करें
- Different location try करें
- Helpline contact करें
समस्या 6: “Registration Already Exists” Error
कारण:
- पहले से registration हो चुकी है
- कोई और आपकी ID से register कर चुका है
- System में duplicate entry है
समाधान:
- Check करें:
- क्या आपने पहले register किया था?
- Password/Login ID भूल गए हो?
- “Forgot Password” try करें
- If आपने नहीं किया:
- यह serious issue है
- Immediately principal को inform करें
- Block office में complaint करें
- Written complaint submit करें
- Police complaint consider करें (identity theft)
- Investigation और Resolution:
- Department investigation करेगा
- Duplicate entry remove होगी
- फिर fresh registration कर सकते हैं
समस्या 7: Page Loading Issues
कारण:
- Slow internet connection
- Server busy/down
- Browser issues
- Peak time traffic
समाधान:
- Internet Check करें:
- Speed test run करें
- Stable connection ensure करें
- WiFi better than mobile data
- Browser Issues:
- Cache clear करें
- Cookies clear करें
- Browser update करें
- Different browser try करें (Chrome recommended)
- Timing:
- Peak hours (10 AM – 2 PM) avoid करें
- Early morning या late evening try करें
- Weekends generally less traffic
- Technical Steps:
- Page refresh (F5) करें
- Ctrl+Shift+Delete – clear browsing data
- Incognito/Private mode try करें
- Computer/phone restart करें
समस्या 8: Form Submission Failed
कारण:
- Network disruption
- Timeout occurred
- Server error
- Session expired
समाधान:
- Immediate Action:
- Don’t panic
- Page refresh न करें immediately
- Wait for error message
- Retry Process:
- “Back” button use करें
- Form data फिर से भरें
- Fresh submission try करें
- If Data Lost:
- Keep form data backed up
- Notepad में save कर लें
- Second attempt में use करें
- Prevention:
- Good internet connection ensure करें
- Form quickly भरें (timeout avoid के लिए)
- All data ready रखें
- Distraction avoid करें
Frequently Asked Questions (FAQs)
Shala Darpan Registration का क्या मतलब है और इससे आप क्या समझते है?
Shala Darpan Registration एक one-time process है जिसके through राजस्थान के government schools के staff members अपना official account बनाते हैं Shala Darpan Portal पर। यह basically आपकी digital identity create करने की process है education department के system में।
Shala Darpan Portal पर कौन-कौन पंजीकरण कर सकता है?
Teaching Staff (पूर्ण पात्रता), Non-Teaching Staff, Block और District Level Officers and Special Appointments.
Registration में कितना समय लगता है?
पूरी process को comfortably complete करने में 30-45 minutes लग सकते हैं, including preparation।
क्या registration के लिए कोई fees है?
बिल्कुल नहीं|, Registration is Completely Free.
Registration के बाद Login ID और Password भूल जाएं तो क्या करें?
For Login ID contact helpline 0141-2700872 पर call करें, अपनी details provide करें, Login ID बता देंगे. For password Login page पर जाएं, “Forgot Password” link पर click करें, Staff ID enter करें, Registered mobile number verify करें, OTP आएगा mobile पर, OTP enter करें, New password set करें, Confirm करें
एक से ज्यादा schools में posted हूं, तो कितनी बार register करना होगा?
केवल एक बार.
Conclusion – निष्कर्ष
Shala Darpan Registration राजस्थान के education system में digitalization का एक महत्वपूर्ण step है। यह process भले ही initially थोड़ा complex लग सकता है, लेकिन एक बार properly complete हो जाए तो यह आपके daily administrative work को बहुत आसान बना देता है।
Key Points to Remember:
Registration Essentials:
- One-time Process – बस एक बार करनी है
- Free Service – कोई charges नहीं
- Mandatory for Staff – सभी eligible staff को करनी चाहिए
- Prerequisites – Staff ID, DOB, Mobile number चाहिए
- OTP Verification – Security के लिए जरूरी
- Password Change – First login पर mandatory
Benefits:
| Paperless administration |
| Time-saving processes |
| Easy access to services |
| Transparent system |
| Better accountability |
| Efficient management |
Support Available:
Helpline numbers: 0141-2700872, 0141-2711964
Remember: Shala Darpan Registration केवल एक technical process नहीं है, बल्कि यह modern, transparent, और efficient education system का हिस्सा बनने का medium है। जितने ज्यादा staff members actively इस portal का उपयोग करेंगे, उतनी ही बेहतर राजस्थान की education system होगी।
हम उम्मीद करते हैं कि इस comprehensive guide ने आपके सभी questions का answer दिया होगा और आप successfully Shala Darpan पर register कर पाएंगे।